A foodie's quest to turn up the heat through strength and conditioning with whole food and a hungry mind.

Showing posts with label ice cream. Show all posts

Tuesday, March 20, 2012

Celebrate Spring with Homemade Peanut Butter Dip N’Dots


Today marks the first day of spring for 2012, and we have nothing but constant rain here to start it off. But that’s ok since the rain will help the grass to grow, flowers to bloom, and everything will have a fresh start! Now we just need to avoid the Texas droughts that usually occur a couple months later.

I saw a few posts (here’s one good example) on homemade dip n’dots over the weekend and was instantly intrigued. I remember getting this from a little cart inside the mall as a kid….mmmm, all the tasty, frozen pellets would melt with each spoonful. It was good, but I’m sure not very good for you.

Enter the wonder and satisfaction of homemade! It’s simple, all you need is yogurt and your preferred flavoring to get started.

Or you could just use an already flavored yogurt that requires no mixing, but where’s the fun in that? Plus, flavored yogurt usually has a lot of sugar that negates most of its health benefits. No thanks!

I’m a fan of peanut butter, so that’s the flavor I immediately thought of for my own Dip N’Dots version. Go ahead, make your own and let me know how much you loved it.

Peanut Butter Dip N’Dots

Ingredients
- 3/4 cup Greek or regular plain, non-fat yogurt (or 2 6oz containers)
- 1/2 teaspoon vanilla extract
- 1/4 cup peanut flour (If you don’t have, you can use 2 tablespoons natural, creamy PB; just briefly heat to make it easy to stir)

Directions
In a bowl, mix together the yogurt, vanilla, and peanut flour or peanut butter until well combined. I actually had a large 32oz yogurt container with the right amount left, so I used this to mix everything.

Put the yogurt into a plastic sealable bag, and zip shut.
Cut a small corner off the bag and use it like a piping bag to squeeze out small dots over a cookie sheet. I used a silicone baking mat for ease of transfer once frozen.


Place in your freezer for a couple hours and wait, impatiently, if you’re like me.

Fold the mat to create a “V” shape and dump (if you didn’t use a mat, use a non-metallic spatula to scrape) into a container with a lid to freeze until ready to eat. Or just eat them right away! Warning: these melt somewhat quickly, so freezing your storage device before hand will help the dots keep their shape.

The best part about this recipe is that you can easily change the flavors to your liking. Here are some alternative suggestions:

Honey or agave to taste; Honey Dots!

Liquid (plain or vanilla) or powder stevia; Sugar-free Sweet Dots!

Favorite flavored protein powder; Protein Power Dip N’Dots!

Blended fruit; MMMM, Peanut Butter Banana Dots!

Pumpkin puree; Pumpkin Pie Dots!

These can and do make for a wonderfully satisfying and healthy treat. Try mixing with nuts and Overnight Oatmeal Crisps for a unique and hearty breakfast!

Kelley’s sister asked us if we’d take her 7 year old daughter (our niece) one weekend to show her the foods I buy and cook. She’s a very smart girl with a non-stop hunger for knowledge, so hopefully she’ll go back to teach her mom and dad a few things on healthy food and cooking! Homemade Dip N’Dots are easy enough to make with a kid and I bet she’ll have a blast helping us make (and eat) this simple treat.

Do you ever spend time in the kitchen with your own or your relative’s kids?

Friday, May 27, 2011

Squash Instead of Ice Cream…

Intrigued? I’ve mentioned something about this on previous posts, but wanted to dedicate today’s post solely to one of my favorite treats. For months I have been making different variations from squash and fruit to have for part of my dinner during the weekdays and weekends.

At first I would use canned pumpkin, but now I try to bake most of the squash that can be used all week. I will rotate with Spaghetti, Acorn, or Butternut squash (whatever looks good at the store), cut in half, scoop out the seeds, place face down on a cookie sheet, and roast them in the oven at 375 degrees for 50 minutes. After cooling a while, I’ll scoop the flesh into a big bowl for use throughout the week. Of course, there’s always a can or two of Libby’s Pumpkin Puree for when I run out or just miss a chance to bake some squash.


With the base of this treat ready for use, I will take several scoops (maybe a cup’s worth) of squash and place in a blender cup. Add to this some frozen fruit of choice followed by one or more of the following: small scoop of plain Greek/regular yogurt, half scoop of vanilla/chocolate whey protein powder, unsweetened cocoa powder, cinnamon, ginger, water, coconut milk, or almond milk. The amount of liquid varies as I never actually measure anything, just eyeball it. I have two plastic cups that are used for these treats and usually have a different creation made for each one. The first cup will usually be a lighter, less indulgent variation, but it's still tasty. The second cup is usually something chocolate soothing for the mind and body. Let me go through the typical ingredients I might use for each cup one night…


Cup #1

- A few scoops of Acorn or Spaghetti squash
- Frozen mixed berries
- Half scoop of Stevia sweetened vanilla whey protein powder
- A mixture of water and almond milk; not a lot as squash has a good amount of water already
- Vanilla flavored liquid Stevia; about 8 – 10 drops
- Small plop of non-fat yogurt
- Dash of ground cinnamon and ginger


Cup #2

- A few scoops of Butternut Squash
- 1/4 frozen banana, 1 frozen strawberry, a few cubes of frozen papaya
- Half scoop of Stevia sweetened vanilla or chocolate whey protein powder
- 4 – 5 tablespoons unsweetened cocoa powder
- A little bit of water, coconut milk, and kefir; maybe 1/2 cup combined
- Vanilla or chocolate flavored stevia
- Broken pieces of whole grain pretzel dipped in a little peanut butter to mix in after blending; I love sweet and salty!

I blend ingredients for Cup #1 and pour (scoop if needed) into the cup, then do the same for Cup #2. When mixed with the right proportions, the consistency is like ice cream, but a lot better and more nutritious. I will place each cup in a koozie and put them in the freezer as I prepare the first part of my meal which is usually a salad with veggies and a lean protein.

After the salad mix meal, I proceed to indulge in the healthy treats that help relax and satisfy me for the night. Does anyone else do anything similar? Please post to the comments and share your crazy creations, I’d love to hear them!

Monday, March 28, 2011

That's Bananas!!!!

Curved yellow fruit, aka bananas, are good and good for you.  Bananas offer the ability to please people that have different tastes.  Some may just them firm with a hint of green for easy slicing over cereal or as a healthy grab and go option.  Others may enjoy the softer, spotty kinds with a higher sugar content.  Then others may only want them super soft and mostly brown skin to mash and use in baking.  Of course, a person could enjoy all of these options as they are all superb choices.  Try buying bananas at different stages of ripeness to enjoy the variety of ways to use these "curved yellow fruit."
Bananas on FoodistaBananas
If you've been led to believe bananas are just unhealthy sugar torpedos, check out this list of 10 reasons to think otherwise (info obtained from this site):

1. Ulcers: Bananas are one of the few foods ulcer patients can eat without suffering setbacks and pain. Bananas lower the levels of acid in gastric juices in the stomach, and build a protective coating inside the stomach.

2. Minor burns: Yes, bananas can provide pain relief from minor burns and other wounds. The best way to accomplish this is to mash up the inside of a banana, then wrap it in a cloth or paper towel and place it on the burnt area. Pain relief should follow shortly thereafter.

3. Acne: The potassium in bananas suffocates bacteria and clears pores. Make a mask by mashing a banana, apply to affected areas, and allow it to dry for 20 minutes.

4. Anemia: The high amount iron in bananas helps stimulate the growth of hemoglobin in the body, which can help with anemia.

5. Blood pressure: The potassium in bananas helps to combat sodium, which is a big no-no for those with heart conditions and high blood pressure.

6. PMS: The high levels of vitamin B6 in bananas help to regulate blood glucose levels, which affects the moods and pains of women suffering PMS. – Men, feed your significant others a banana to maintain happiness!!

7. Cramping: All the potassium in bananas is good for cramping, allowing the body’s muscles to more freely contract and expand. This is especially important for the athletes.

8. Constipation: Bananas are a natural, light laxative, allowing the body to deal with constipation without turning to diarrhea. The fiber provided by bananas is the reason for this….obviously.

9. Depression: Believe it or not, bananas are great for lifting ones mood. Bananas contain tryptophan, a mood leveling protein also found in turkey. And like chocolate, bananas contain norepinephrine and serotonin, which can help one relax. Also, the vitamin B in bananas helps to calm the nervous system.

10. Smoking: The combination of vitamins A1, C, B6 and B12 in bananas, along with potassium, helps those who are trying to quit smoking from nicotine withdrawal.

So, now you have some good reasons to incorporate bananas in your diet. Don't feel like just peeling and eating a banana by itself every day?  You're not alone!  I demand excitement from my food and always look for new and interesting ways it can be used. 
 
Here are a few ideas for more variety:
  • Use ripe bananas (soft with a lot of brown spots), to make a healthy banana bread or muffins.  Allrecipes.com has a lot of different recipes, I like the ones that use yogurt, applesauce and mashed bananas in place of the usual oil....here's a good one to follow.
  • Peel and place in freezer for few hours.  Once frozen, you can blend bananas with a little milk to make a quick, healthy, banana ice cream.  Try adding some peanut butter or other nuts when blending for some great crunch and flavor.
  • You can also put a popsicle stick into a half banana, wrap in plastic, and freeze for a quick banana-pop.  Dip in chocolate and roll in crushed cereal or nuts for a special treat for both kids and adults.
  • Be creative, I used homemade chocolate protein pancakes
    for my sandwich!
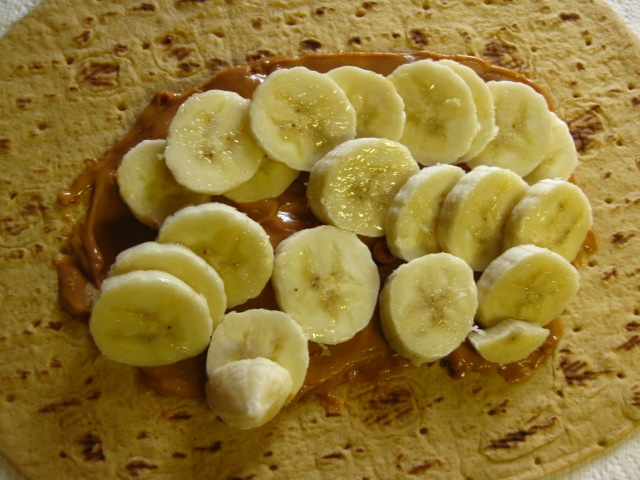
  • Make a peanut (or other nut) butter, banana, and honey sandwich or wrap.  Just slice a firm banana and place with nut butter between whole wheat bread or whole wheat wrap; add honey to taste.  If you have a soft, ripe banana, mash it and use it as a spread on the sandwich.  Try tossing whole or crushed nuts for a crunchy sandwich.  Combining the healthy fats and protein from PB with the high quality carbs from bananas is a good option for the insulin sensitive. The reasoning is two fold; one, it tastes awesome, and two, the protein and fats help slow down the speed at which the sugars enter your body keeping insulin steady.
  • Heat a skillet over medium-high heat, add a touch of butter to the pan and saute banana slices for a few minutes.  The natural sugars will carmelize and make a for a tasty treat alone, on ice cream, yogurt, or on a sandwich with peanut butter.

Don't limit yourself to just banana bread, you can use ripe, mashed bananas to replace at least half of the oil called for in many recipes which will make your creation sweeter and healthier.  Remember, you do not need to add as much sugar if using bananas.  Check out this site for 100 ways to use a banana.

It's not shown here, but a dollop of greek yogurt really helps the flavor and protein content.
With the plentiful options available to use a banana, one of my favorites is wrapping 1Tbs peanut butter, half a banana, a drizzle of honey, and some vanilla protein powder in a whole wheat wrap (I like FlatOut Bread).  Then wrapping that in foil and placing in the freezer.  Then there is a quick breakfast waiting for you when in a hurry or a nice treat any time of day.


Hope this motivates you to use bananas and have fun at the same time.  If you don't like them ripe, store in the fridge to slow the process down.  On the other hand, place in a paper bag to speed the ripening process along.